Showing posts with label Art. Show all posts

Saturday, December 28, 2024

Year in Review 2024

With 2025 waiting in the wings, I am casting an eye back over 2024 and finding that it looks pretty shiny from here. Overall, it felt like there were fewer extraneous disruptions and distractions than there have been for the past few years - I got the chance to dig in to my hobbies and push hard. I also feel I did a good job of moving existing projects toward completion and taking a few overdue items off the backlog, instead of just starting new work.

Fireworks: three "artillery shell" style bursts in a loose row, two gold with blue accents, one white. No horizon is visible. Photo of fireworks in Bratislava by Ondrejk, public domain.

Per my personal tracking, I've logged more hours of total "work" than I did last year, and kept the creation/maintenance ratio above 3x ... just barely. Monitoring my own time usage over a long period raises some interesting flags. For example, I spent more time on my blog articles this year than I spent writing and publishing short fiction, by 6+ hours. (Those "AI Ideology" articles were a lot of work. Writing about real people's viewpoints and trying to be critical but fair eats serious hours.) I don't think I want the blog to be taking that much, so I'm not planning an in-depth series for 2025, and I'll probably let my article rate drop below two per month. But where writing tasks are concerned, even the blog loses the time hog prize to journaling. I'm a little uncomfortable with the fact that recording my life uses so much of it up, but I also really like journaling (and it's easy, so if I dumped it, some of those hours might go to recreation instead of harder tasks). Other mundane time-stealers are on the small side, but still galling. I logged more hours on food preparation than on studying, and more on housecleaning than on art.

Acuitas remains the king of all my hobbies at 360+ hours invested. That's a good number - I found more time for him in 2024 than in any other year of the past five. The robots also fared very well at 110+ hours.

So what did I achieve with all that time? Well, here goes.

*The first major Acuitas milestone was completion and demonstration of the "Simple Tron" story in February. This was a target that I had been silently keeping in mind and laying groundwork toward for years.
*I have unified issue tracking across multiple code blocks, such that the Game Engine, Executive, and Conversation Engine all now use the "scratchboard" structure I developed for Narrative understanding.
*I integrated the improved Text Parser, achieved substantial benchmark improvements in the number of parseable sentences, and worked on a number of ambiguity resolution problems.
*I overhauled and improved the Conversation Engine, and released a demo video just this month.

Atronach's Eye, the mechanical eyeball. The eye sits in the middle of a scalloped, curvy case with ball-and-claw elements, designed to resemble old furniture. It is colorfully printed in black, white, red, and yellow plastics.

*The Atronach's Eye project is almost complete. This year I finished rebuilding the case and demonstrating eye centering with the limit switches, and I reworked the software to use a better motion tracking algorithm. All that's left is a power cutoff to keep the stepper motors from getting hot when not moving. By early next year, I'm hoping the Eye can be a working fixture on my living room wall.

Final version of the peristaltic pump (without its front shell/lid)

*I completed my homemade peristaltic pump design and ran a performance comparison on several pumps.
*I built and demoed a second iteration of the prototype small-scale hydraulic system, including my first homemade fluid bladder actuator.

Two 3D printed gears in white plastic, with a dime for scale. One of the gears is smaller than the dime, the other slightly larger.

*ACE didn't get a lot of love this year, but I did run some more motion tests and decided gearboxes would be needed - after which I designed and built one to work with the existing motors.

A small 3D printed gearbox (three total gear pairs) with a stepper motor installed. The drive shafts are made from Bic Round Stic ballpoint pens.

*I wrote two new short stories: a science fiction piece about alien plant life with an unusual way of communicating, and a fantasy piece about a young woman who finds the rules of society standing between her and her perfect pet.
*One of my previous stories, "Peacemaker's First Strike," was accepted by Abyss & Apex and is on contract to be published in July 2025. This is very exciting. (Check out the new "Read my Writing" link in the top bar to see all my published work and where to get it.)
*My blog publication rate stayed at/above two posts per month for the third year in a row.

A hexagonal curio display case, printed in red plastic, is shown with the front panel pulled off and set to one side. An assortment of TTRPG miniatures occupy the little shelves inside the case. The magnets that hold the front panel on when it is installed are in evidence.
One of the display cases, acting as a home for D&D characters past

*I designed a series of 3D-printable medallions and printed examples of all the designs to give as gifts.
*I also threw together a fully-enclosed hexagonal display case design and fabricated four of them, for dust-free housing of my miniatures and curios.

*I hired a plumber to fix the kitchen sink, and thereby got rid of the last known high-priority breakage in my house.
*I cleaned out and organized two different "disaster rooms" and tore down some e-waste for salvage in the process.
*I grew potatoes again. The garden wasn't especially successful this year, but I at least maintained production of my staple crop.

I wasn't terribly successful at adding native plants to my yard, but Blazing Stars were one of the species that worked out, and they bloomed this year.

*I made a road trip to Arkansas and observed totality of the solar eclipse that crossed North America in April (with a detour by Space Center Houston on the way).
*The first Worldview Legion satellites were launched. I made a small contribution to these, in the form of some post-delivery debugging and feature enhancement work on the component my employer built for them.

Until the next cycle,
Jenny

Wednesday, November 13, 2024

3D Printable Art Medallions!

This is a quick announcement that I made some new 3D models, which I'm offering to the community free to print. It's a collection of medallions that would make great window hangings or large Christmas ornaments - so I'm getting them out there in time to prepare for Christmas, or whatever winter holidays you celebrate. I have them available on Cults 3D and Thingiverse:

https://cults3d.com/en/design-collections/WriterOfMinds/tricolor-medallions
https://www.thingiverse.com/writerofminds/collections/42747021/things

Try printing them in translucent filament with an interesting infill pattern and hanging them in front of a light source. They all come with the hanging loop - I might upload versions without it later, so let me know if there's interest.

Each medallion has three surface levels for a 3D effect, and is designed to be printed in three colors of your choice. If you don't have a multicolor printer, you can still get this result without too much fuss by inserting pauses in the GCODE and changing filaments manually. Here's an instruction video that explains how to do it in several popular slicers: https://www.youtube.com/watch?v=awJvnlOSqF8&t=28s

Solar Fox color variations.

It took some further work to do it on my Anycubic Vyper, which doesn't properly support the M600 color change command that the slicers insert automatically. While the Vyper will stop printing and move its head away from the print for a filament change, the LCD screen doesn't update with a "resume" button ... so you have to reboot the printer, which cancels your print. I learned how to control the Vyper with Octoprint, a tool originally designed for remote control of a printer you keep in your garage or something. The advantage for our present application is that Octoprint takes over the process of sending G-code to the printer, and gives you pause and resume buttons that make up for the shortcomings of the Vyper's internal firmware. I did a find-and-replace in my G-code files and replaced all the M600s inserted by the Prusa slicer with Octoprint "pause" commands. Some custom "before and after pause" G-code was also necessary in Octoprint to get the print head away from the print and move it back, so it wouldn't drool filament on the medallion during the swap process.

The 3D model for the Solar Fox medallion, displayed in DesignSpark Mechanical with suggested coloration.

Some of these designs, in particular the bird and the neurons, have delicate parts that may have a hard time adhering to your print bed. Print the first layers slowly and adjust your bed heat and cooling as needed.

Have fun! I look forward to seeing some other people make these.

Until the next cycle,
Jenny

Tuesday, August 15, 2023

Sunless Sea: A Matter of Danger

It's about time I finally talk about Sunless Sea, as it's one of the video games that had a deep impact on me as a person. It's been many years since I finished playing it now, yet the experience still reverberates. Its game design and its writing both had a lot to do with this.

Sunless Sea showed me something about faith, security, risk, and courage. It forced me to examine what I value, and what I'm willing to spend for it. It taught me some things are worth suffering for.

A screenshot from Sunless Sea, provided by Failbetter Games. Overhead view of a little steamship on dark blueish-green water, approaching the Avid Horizon, a gate out of the subterranean Neath. Faint glows illuminate statues of two gigantic figures looking down on the gate - they're very abstract, smooth, and rippled, possibly bat-winged figures wearing hoods. There are also boulders to either side of the gate, with glowing sigils on them.
Sunless Sea screenshot, from Failbetter Games. This is the "Avid Horizon," a gateway from the subterranean Neath directly into ... space?

And in a curious intersection of two very different works, it also helped me understand The Chronicles of Narnia better than I ever did before. They were accessible to my child self, of course. I read them then and got a notion of what they were trying to say. But some ideas don't develop fully until they are informed by experience, and it's experience that video games excel so thoroughly at providing. I'm going to relate the two as I try to explain what I got out of this game.

First comes the rather counter-intuitive thought that someone overwhelmingly righteous and positive is not necessarily safe, expressed in this little excerpt from The Lion, the Witch, and the Wardrobe:

“Is—is he a man?” asked Lucy.
“Aslan a man!” said Mr. Beaver sternly. “Certainly not. I tell you he is the King of the wood and the son of the great Emperor-Beyond-the-Sea. Don't you know who is the King of Beasts? Aslan is a lion—the Lion, the great Lion.”
“Ooh!” said Susan, “I'd thought he was a man. Is he—quite safe? I shall feel rather nervous about meeting a lion.”
“That you will, dearie, and no mistake,” said Mrs. Beaver, “if there's anyone who can appear before Aslan without their knees knocking, they're either braver than most or else just silly.”
“Then he isn't safe?” said Lucy.
“Safe?” said Mr. Beaver. “Don't you hear what Mrs. Beaver tells you? Who said anything about safe? 'Course he isn't safe. But he's good. He's the King, I tell you.”
“I'm longing to see him,” said Peter, “even if I do feel frightened when it comes to the point.”

To describe how Sunless Sea illuminates this, I'll have to start by giving some background.

Sunless Sea belongs to that subgenre known variously as “Eldritch,” “Cosmic Horror,” or “Lovecraftian Horror.” The basic hallmark of such a setting is that the universe is secretly chock full of Things Man Was Not Meant to Know, and dominated by otherworldly powers (alien or metaphysical – at some point the lines start to blur) whose modes of existence lie beyond our comprehension. Interacting with these powers, or digging beyond the comforting surface of the world to learn The Real Truth, is liable to ruin one's mind. Sunless Sea's flavor of this emphasizes the wonder that rides right alongside the terror, which is part of the reason why I like it so much. Nonetheless, the game is positively crawling with danger, and the worst of it goes beyond even main-character death. You can sell your soul – literally – or sell it figuratively in any number of different ways. You can get entangled with a couple of particularly nasty cults. You can acquire a semi-permanent craving for human flesh (ew). You can watch your crew start killing each other under the influence of insanity and privation. And here's the best part: the game will force you to make important decisions on the basis of very incomplete information. Navigating it was an exercise in trying to avoid things that smelled bad without crippling my ability to explore and learn. I was faced with a few choices in which either course of action might have devastating results. Sometimes I got it right; sometimes I didn't.

All the dangers I just listed apply to one's in-game character, but there's a sense in which Sunless Sea is dangerous for the player as well. This arises from two important features of its design. First, it's basically a narrative role-playing game, and like many RPGs it demands some “farming.” Preparing your character for the game's greatest challenges calls for many hours of hauling trade goods around the ocean to amass experience, wealth, and equipment. Second, if you play it as it's meant to be played, there is no possibility of restoring your game – mistakes cannot be undone. This includes mistakes that result in your character's permanent death. So whenever you make a chancy decision, you're rolling dice with a substantial time investment. Farming longer before attempting the more difficult parts improves your chances of success, but it also increases the amount of work you lose if you have to die and start all over. As the endgame approaches, daring leaps into the unknown become proportionally less attractive, and moral dilemmas grow teeth.

It was into such a world that I apprehensively launched my little virtual steamboat, eager for discovery, but also determined to guard my character against death if at all possible.[1] I was immediately faced with the problem of which of the underground ocean's Powers were safe to interact with. You can hobnob with everybody from the king of the aquatic zombies to an enormous sentient coral reef, but that doesn't mean you should. Prominent among these characters are the three known as the “sea gods,” who sometimes serve as patrons for travelers: Storm, Stone, and Salt. Storm is the dragon who lives in the roof; he is perpetually angry and likes blood sacrifices, sometimes of the human variety. I didn't care for him much. Stone is a living mountain whose presence acts like a fountain of youth for those lucky enough to dwell near her base. She helps sailors return home and stay alive. She's the closest thing the setting has to a benevolent entity who might watch over you. And Salt … it's somewhat unclear what Salt is. It[2] is the patron of horizons and farewells. It likes offerings of secrets. It's pleased when you take strangers on board your ship. It's enigmatic, challenging, and unpredictable. And I proceeded to surprise myself by liking it best out of all the three.

Stone would've been the natural choice for a nervous captain to kiss up to, but somehow I was drawn to Salt instead. It definitely wasn't safe, but over and over again I gambled on it anyway. And as things turned out, some of the most rewarding moments in the game happened when I went out on a limb to interact with Salt, and it ended up paying off.

Now when I say “paying off,” I don't mean that my character was rewarded with wealth, comfort, or power. What Salt generally provides is the chance to gain enlightenment and transcendence by doing painful, frightening, stupid things. Granted, Sunless Sea's explicit knowledge economy permits even enlightenment to be processed into currency and stat points, but there were plenty of other ways of getting those. It wasn't the numerical advancement that I really valued here.

The weirdest thing about all this is that I don't think my appreciation for Salt arises in spite of the fact that it is not comfortable. I like Salt precisely because Salt is not comfortable. If reaching out hadn't cost me a little apprehension – if I hadn't been compelled to take some things on trust – then it wouldn't have been worth as much. If the benefits Salt offers didn't entail some risk and strain, they wouldn't be worth nearly as much either. And if Salt weren't mysterious, unknowable, and even mind-shattering, half the wonder would be gone out of it too. This creature would be ordinary … on my level. Sublunar.

And zooming out from the context of the game, I realize that I don't want God in the real world to be entirely comfortable either. I don't need Him to be fully comprehensible by my human brain. I don't need Him to make all kinds of guarantees to me up front. I want Him to be enormous and awe-inspiring and holy. I don't want Him to make everything easy for me all the time. I might even want to do some of those painful, frightening, stupid things. I want to embrace what is arduous and costly in my spirituality. I want to be glorified, not safe.

And that is why I finally understand what C. S. Lewis was talking about in that kids' book on my shelf. Or what Charles Williams is talking about, with just a hint of disparagement, here:

"... they couldn't all want Archetypes coming down on them, not if they were like most of the religious people he had met. They also probably liked their religion taken mild -- a pious hope, a devout ejaculation, a general sympathetic sense of a kindly universe -- but nothing upsetting or bewildering, no agony, no darkness, no uncreated light."[3]

Church (the type that I attend, anyway) frequently emphasizes the warm, benevolent attributes of God – the ones that would be better represented by Stone. The God they talk about here is the God who saves people, loves people, forgives without limit, and cares about your problems. And these are all valid aspects of His character, I believe. But personally I wish we discussed the God of mystery and majesty a little more often.

More to come in Part II, in which I talk about Going East. And if you follow me on social media, I will be posting The Neathbow. What's that, you ask? Vivid colors from a place without a sun.

[1] Sunless Sea expects that you will die a lot and go through many characters.  I died only twice – and one of those times, the primary cause was a bug!

[2] I prefer not to use "it" for any sort of sentient being or person, even an incomprehensible genderless alien. I'm following the game's writing here.

[3] Quote from The Place of the Lion.

Friday, September 9, 2022

Anycubic Vyper 3d Printer Review

Many of you may already be familiar with my recent decision to become a two-printer household. Here I'm doing a more formal write-up to help others decide whether a Vyper might be the right printer for them.

A Qidi Tech X-One 2 3d printer (blue metal box with plastic windows) sits next to an Anycubic Vyper 3d printer (vertical black metal frame with tan PEI build plate)
My little manufactory now.

My original printer is a Qidi Tech X-One 2, and you can read my early review of it here. Since I got it, the X-one 2 has produced all the pieces for three substantial projects - Ghost, Atronach's Eye, and ACE the quadruped - plus quite a few gifts for friends. So it's been a pretty solid workhorse, but I decided to add the second printer for several reasons.

1) I wanted a larger build volume. The X-One 2 can't print anything bigger than about 6x6x6 inches. The limitations of this became most obvious when I couldn't help print face shield parts during the early pandemic, because the models wouldn't fit. I can usually get around the limitation by splitting models and adding joins, but sometimes that just doesn't work. The Vyper's volume is much larger than the X-One's, and slightly larger than typical printers in its class, at 245 x 245 x 260 mm.

2) I wanted to potentially run both printers at once and accomplish projects faster.

3) I just wanted to try out one of the ubiquitous "Rep-Rap" style printers, with the open frame. This is a very different design from that of the X-One, which is a self-contained box. The X-One's print head is suspended from the upper inner portion of the box and moves in the XY directions, while the build plate moves along the vertical (Z) axis, along a lead screw. The Vyper moves its plate along the Y axis, and its print head along the X and Z axes.

A cat lying on top of an Anycubic Vyper 3d printer, disassembled in its box. The vertical part of the printer is visible nestled in black packing foam.
Unboxing and inspection

The Vyper also came with some quality-of-life improvements over the Qidi. It has automatic bed leveling. As careful as I was with the X-One's bed, in the end the only way to get it perfectly level was to do test prints and see how much the filament was "smashed" on different sides of the first layer. So this was a welcome feature - and possibly a must given the much larger print bed. The printing plate itself is a spring steel sheet coated with textured PEI (a slippery plastic), and magnetically attaches to the underlying heated bed. The idea is that you can remove the plate and bend it to peel away stubbornly attached prints.

The only real disadvantage of the Vyper, compared to my previous printer, is that it's not fully enclosed. So when I start wanting to print PETG or ABS on it, I'll probably need to rig up a tent for it to hold in heat. It also doesn't come fully assembled. But I'm feeling braver now than when I bought my first printer.

A cat clawing the packing foam of an Anycubic Vyper 3d printer, still in its box.
Packing foam must be destroyed.

The Vyper requires light assembly. The print head, the filament feeder, the bed mechanicals, etc. are already all together; the end user just needs to bolt the upright portion of the frame to the base, attach the touch screen and the filament holder, and connect some cables. All necessary tools are included. It took me (going cautiously) about an hour and a half to unbox the printer and put it together.

Base, build plate and included tools, shown packed in the small tool drawer that fits into the base.

Preparations for first print also went very smoothly, with one exception: the weak documentation forced me to look a couple of things up on the internet. This is another Chinese printer and I think they may not have used the greatest English translation services. To start bed leveling, you're supposed to "touch" the metal nozzle with a tool. I touched it repeatedly, to no avail, holding the wrench in different orientations in hopes of lining it up with some optical sensor. Turns out the sensor is neither optical nor capacitive; it's a pressure sensor. You have to *push* up on the nozzle, not just touch it. The other little hitch was that the printer's internal file system does not allow for folder navigation, so all GCODE files have to be in the root directory of the SD card (and the sample file that comes on the card is not!). So I had a brief scare when I repeatedly poked the folder name on the touchscreen and it wouldn't open. But this is apparently normal. You just have to read the SD card using a regular computer (this printer comes with a USB SD card reader too!) and move the sample file into root.

The Vyper heats itself to operating temperature before running the bed-leveling routine, presumably to make sure that the results account for thermal expansion of the parts. The print head will tap the bed with the nozzle in a mesh of locations to check and adjust the height. When I ran leveling for the first time, some plastic goop oozed out of the nozzle and left dots on the print bed. I take this as a good sign: QA must have run a test print, or at least checked filament feeding, before the printer was disassembled for shipping. I ended up running leveling a second time after the nozzle was cleaned out, just in case that leftover filament blobbing out of the nozzle interfered with results in any way. The automatic leveling seemed to work well. My first prints adhered to the bed just fine and had great-looking first layers.

So bed leveling just worked, and then filament feeding just worked - both into and out of the nozzle. This overcomes the biggest operational flaw of my X-One, which is frustrating to load and has *never* been able to retract filament successfully. I have to hold down the filament release lever and manually yank the filament out; telling the printer to retract it just results in slipping feed gears and the creation of a swelling in the warm filament below, after which I have to take apart the print head to get it out. The Vyper looks as though it could have more points of failure with its more complex feed path, but I had zero trouble loading my first PLA, then changing colors later.

Printing! The latest version of the eyeball cradle.

The Vyper feeder also has an extrusion tension knob, another feature new to me. My first print appeared to have slight signs of under-extrusion, so I made a small adjustment, and left it alone otherwise. For future maintenance purposes, there appear to be easily accessible mechanisms for tightening the belts. 

I decided to be brave and print directly on the PEI build surface, instead of covering it with tape. This also worked wonderfully. I was able to pull all four of my prints off without even removing the plate to bend it. One of them (a large, flattish piece) even released itself from the surface after being left to cool long enough, and was lying there loose when I came to get it.

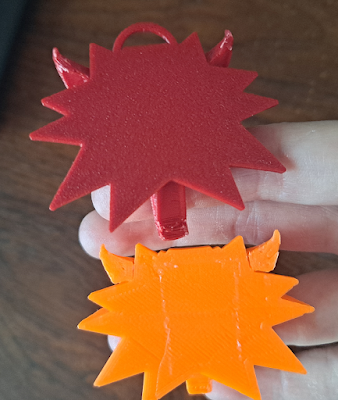
Two 3d-printed Wolf School amulets, one in dark red PLA (left) and one in bright orange PLA (right). Top/front view.
First print from Vyper (left) compared with first print from X-One 2 (right). Model by Thingiverse user Daniel_W.

I've seen some reviewers complain that the magnetic build surface doesn't have any slots or guides to fit into, so it can be a pain to line it up perfectly when sticking it back onto the bed after print removal. I re-seated it when assembling the printer and found that yes, it's a little tricky, given that the strong magnet will try to pull it down fast and fight your attempts to shift it. I don't consider this an important issue. So it demands a little more care and coordination - oh well. I'm more concerned that the PEI surface isn't a sticker. If it gets scratched or gouged, I think you have to replace the whole spring steel plate, for about $25. But one of my future goals is experimenting with other surfaces, so I may end up layering something removable on top of it anyway.

I used Cura to slice my models, as I do for the X-One. It doesn't have printer-dimension presets for the Vyper yet, but the documentation will tell you how to start from existing presets and change the numbers to fit the Vyper. The manufacturer also provides recommended PLA print settings, which I loaded in and tweaked to my liking. No problems here.

The bottom sides of the two amulets. Red (Vyper-printed) amulet has a very even surface with a regular marbled texture on it. Bottom amulet (printed on tape) has traditional smushed diagonal lines plus some irregularities from boundaries between tape strips.
And the underside: first print from Vyper (top, textured PEI surface) compared with first print from X-One 2 (bottom, blue painter's tape). Model by Thingiverse user Daniel_W.

Print quality was great. I won't say "perfect," since I can see a few hints of wall irregularities, and the support situation on my first model was less than ideal. But I think quality is slightly better when compared with my very first print on the X-One (same model). I also haven't yet tried to really dial in the Cura settings.

After my initial test print, I put the Vyper straight to work on a new iteration of Atronach's eyeball (three parts, all PLA), and this went off without a hitch. I think that's a pretty good test for all the basic functionality. Prints I have yet to do include 1) something really detailed, like a miniature, 2) a print-in-place tolerance torture test, and 3) something in PETG.

A 3d-printed "eyeball" with a webcam mounted inside, sitting in its rotator cradle. Transparent nylon lines run like lines of longitude from holes around the "pupil" to the back of the eyeball.
The latest eyeball. More about this later!

On the whole I'm very happy with this printer. It was on sale on Newegg, and I got it for about $350 with free shipping. I was a little concerned about quality as compared to e.g. a Prusa, but at half the price I was willing to risk it, and I think that has paid off.

Until the next cycle,
Jenny

Sunday, April 10, 2022

Atronach's Eye 2022

I can finally show off the new and upgraded "Atronach's Eye!" I actually did this work last year, but never got the blog put together ... mainly because I wanted a demo video, and somehow, making that was such a scary little chore that I kept putting it off. (It took less than an hour, even though I had half-forgotten how to set everything up, so ... why, me? On the plus side, the Eye still worked perfectly after sitting around for months.)

The eye semi-assembled, showing the internals.

With some 3D modeling skills under my belt, I was ready to try an upgrade of this old project. My objectives were threefold:

1. Improve the aesthetics and manufacturability of the housing
2. Get a camera in the eye and finally do some basic motion tracking
3. Add limit switches for the eye motion

The New Housing

I think Goal #1 was a complete success. (The colors are a little garish, maybe. I should try three instead of four next time.) Atronach was conceived as the genius loci of the house ... so for the case style, I tried to draw inspiration from fancy old furniture, especially of the "ball in claw foot" variety. The Hebrew lettering is a nod to golem legends, as it was in the original case design. I modeled most of the case parts in DesignSpark Mechanical, and used Meshmixer's sculpting tools to make the claw.

An exploded view of the case model in DesignSpark Mechanical (minus the claws).

Claw sculpting in Meshmixer

I had a variety of print difficulties -- first and perhaps worst, trouble with tolerances. In hindsight, a sixfold-symmetric design like this is not one I would recommend to beginners. It takes a lot of printing to discover that mistakes added up as you went round the circle, and your final pie-wedge doesn't fit. Trial and error ended up winning the day on this problem.

The flat panels (especially the ones with sharp corners) sometimes warped. I put a stop to this by turning up my heated bed temperature and shutting the printer enclosure. My printer's manual recommends leaving the door open when printing PLA, but it was rather cold in the house, and that may have contributed to the poor results.

A selection of completed case parts. Below: assembly of the base plate.


Holes and pegs worked well enough for Ghost, but this model benefited greatly from the addition of some twisted-wire joins.  They offer a more positive connection than the pegs while still allowing for disassembly. I used them to torque down the corners of the top and bottom panels, supporting the basic alignment established by the peg/hole connection in the center. The motor mounts are also wired to the bottom panels. I used beading wire for the purpose.

The finished case (minus the camera and other internals), with Ursula the cat sitting next to it. She is squinting one eye as if winking at the camera.
*wink*

I included some holes on the inside walls of the case for mounting the controller boards. Rather than using screws, I tied the board mounting holes to the case mounting holes -- the boards are held in place by opposed tension.

Motion Tracking

The motor controller for the original Atronach's Eye was an ATTiny, but I needed something more sophisticated to process video from the camera. I got off to a bit of a false start by buying a CHIP mini-computer. It had the features I needed without any fluff -- one USB port for the camera, and wifi for communication with a desktop server -- and at $9 each, the boards were cheaper than their competitors. But it proved to be more trouble than it was worth.

A closer zoom, showing how the boards are mounted to the case.

My first attempts to use the CHIP were mired in driver problems. Trying to communicate with it would bluescreen my old Windows 7 desktop (yes, really), and customer support didn't have much help to offer. This was several years ago, and I had nothing running Windows 10 at the time. I finally managed to talk to CHIP from the old scrap Linux machine, and get said Linux machine (which wouldn't recognize its network card) a working internet connection so I could actually install things on CHIP. By then I was exhausted, and set the project aside for a while.

By the time I was ready to go further, Next Thing Co. had folded, making it impossible to buy more CHIPs. I wanted multiple eyes (eventually) and didn't feel like investing even more struggle into a hardware platform I couldn't re-use. So I bought the standard Raspberry Pi: more expensive ($20-$25), but extremely established and reliable.

Finished!

I set up a wifi connection between my (now Windows 10) desktop and the Pi without much issue, and got Python and OpenCV installed. The Pi had a USB port and no trouble recognizing my cheap tiny webcam. From there, I was able to get cracking on the video processing. 

I used a dirt-simple method: detect pixels that have changed between one frame and the next, and compute the center of mass of the point cloud. It's not very good. Even with some thresholding and averaging added to the process, it's bad at telling the difference between actual moving objects and random camera noise. It's easily fooled into pointing at things like shadows. And it can't subtract changes caused by the camera's own motion, so tracking is not smooth. After the eye spots a moving object, it has to finish aiming at it before it can check whether it has changed position further; it cannot track while moving.  As you can see from the video (below), it's terribly unresponsive. But it will look at me.

Since it's not precise at all, I simplified the motion further by making it discrete: I divided the visual field into nine regions. If the center of motion is not currently in the central nonet, motor control will rotate the eye by enough steps to aim at whichever nonet contains it.

Limit Switches

The original Atronach's Eye was programmed to move randomly. The processor would roughly track its orientation, but had no concrete way of knowing when it had rotated as far as possible in any direction ... so it would occasionally run it past its range and stall the motors. This didn't seem to hurt the steppers any, but stalling motors isn't a nice thing to do, and this was lazy on my part. So I really wanted to add some limit sensors to the new version.

Unfortunately, this didn't work out, and will have to wait for yet another version of the eye housing. Setting limits on the motion of a spherical object rolling in a cradle is just obnoxiously hard. The extended lip around the camera cord port at the back of the eyeball was supposed to be part of the limit sensor. Wrapped with aluminum foil, it would serve as one switch contact, and touch one of four partner contacts on the underside of the cradle whenever the eye rolled far enough over. In practice, I had huge trouble getting the angle and contact height correct so that they would actually touch. I became desperate to get the eyeball working, and this became a problem for another time.

In lieu of having limit sensors, the eyeball controller does a startup calibration routine. It drives the eyeball into motor-stall territory along each axis, then (using that as a known position) returns it to center. It then moves the eye a fixed number of motor steps to transition it between its nine possible discrete positions. This is control by dead reckoning, and is not guaranteed to be reliable over the long term ... recalibration might be needed from time to time. But in my tests, it seems to work well enough.

Motor mount and driver board.

Future Work

*I still need limit sensors, obviously.

*The motion of the eyeball in the cradle is not as smooth as I would like. I tied nylon threads across the seam of the ball in order to stop it from catching on the cradle's edge. I probably need to add more of these, or I could consider some sort of bearing.

*I'd like the eye to have a greater range of motion. This is affected by the diameter of the cradle and the placement of the tendon attachments.

*I've had trouble with the differential eye tendons getting slack in them, which causes a delay in motion when the eye changes direction. This is a mechanical issue I need to figure out.

*I'm still using my favorite two-wire unipolar stepper motor controllers. They provide no way to cut power to the motor coils, which means that even if the eye is not moving, the motors sit there and get toasty-warm. The eye is intended for long-term continuous operation, so this is not really what I want to happen. I need a power cutoff.

*More advanced image processing and tracking algorithms.

Tuesday, January 11, 2022

New Frontiers in 3D Printing

I had the 3D printer busy last November, but a lot of the results were embargoed on account of being Christmas gifts. Now the embargo is no more and I can be a showoff! In case you've just arrived, my printer is a Qidi Tech X-one2. You can read my review of it if you're interested. Over the summer I added a small modification to solve the problems with the filament feed tube, and I'm happy to report that this worked very well -- I never had to wait around at the beginning of a print to properly settle the tube, and never had any trouble with the filament kinking.


My giftee happened to like Star Wars and I settled on a couple of things in that vein. The first was this clever little Death Star box by Thingiverse user C47_3D, with added stand from an alternate model by monkey_g. This was a PLA print and was fairly straightforward. I decided to be daring and print the two half-spheres without any supports, and to my surprise the printer handled the bridging beautifully. Perhaps it helped that the upper interior surfaces were flat. Microcenter was out of gray PLA, so in desperation I bought marble instead ... and I'm actually glad, because I think it fits and even ended up adding some textural interest. The other great thing about this model is that the threaded ring prints separately and, if you're careful and patient, you can friction-fit it into one of the two domes without any glue.


The other thing I wanted to print were these coasters by QuantumZ. Since coasters are for drinks, these needed to be printed in water-resistant PETG. (PLA is a bioplastic and eventually breaks down if exposed to too much water.) And while I *could* have printed them in just one color, I saw that they seemed ideal for printing two-tone, and somebody had already done it, and it looked too good to pass up. So because I'm crazy, I decided to do two new things I'd never done with the printer before, with a deadline of shipping in time for Christmas.


My printer only has one extruder, so to print the coasters in two colors I had to get it to pause at the right time so I could change the filament. Adding the pause after a particular layer proved surprisingly straightforward in Cura, which is the slicing software I use. And after printing so many coasters, I even got kind of good at swapping the filament (which continues to be the most frustrating thing to do with my printer).

Getting the PETG to behave was quite a bit harder. It has a higher melt temperature than PLA and tends to ooze out of the nozzle, leaving annoying strings on your prints. I made some cookie cutters as test prints before I started on the coasters, and experimented with different temperatures and retraction settings. In the process I got my bed height and leveling dialed in so I could get a really nice first layer -- but I never really solved the stringing, no matter what settings I tried. Fortunately, once I started on the coasters, their particular shape didn't seem to lend itself to quite such bad stringing, and what did happen was easy enough to clean up.

A closeup of that pretty bottom-side finish. I still print on tape, and you can see the faint lines ... but otherwise, this is smooooth.

I did observe that it became more important to clean the nozzle often. Some of the PETG would migrate or splatter up onto the brass, where it would turn into burnt gunk that eventually wanted to fall off onto the print, producing ugly discolored areas. I am sorry to say that babysitting the prints was also necessary for the best possible results. It helped if I went to check them every now and then, and snatched or scraped or cut off any large strings or globs that had developed, before they could mess up subsequent layers.

Bed adhesion was also trouble. To get that smooth, professional-looking bottom layer without any weird wrinkles in it, I had to make the distance between the print bed and the nozzle larger than I normally would. And as soon as I did that, the PETG started having trouble sticking, because I wasn't smashing it hard against the bed surface anymore. The only solution was to print the first layer verrrry slowly. I mean very ... I think I went down to 10 mm/s.

Early attempt with bad top surface (left) and final product (right)

In the end, the most difficult thing was getting a nice top finish. The final layers of the print would always turn out really rough; either there would be "whiskers" of broken filament left sticking out all over them, or they would just be very rumpled, as if too much filament had been extruded and the nozzle had dragged through it. It took me forever to figure out what was causing this. One important clue was that the extruder would start making a loud, intermittent "tunk! tunk!" sound as the printer was working on the final layers. This means it's having trouble pushing the filament out; in the past, I've heard it when the nozzle was partially clogged, but that wasn't the problem here.

I kept thinking it was a problem with the way the filament was melting or flowing, and messing with the nozzle temperature and retraction settings. I also tried "ironing," and that was its own little disaster. If you turn on ironing, the nozzle makes an extra pass over the final layer, re-heating it while only extruding a tiny amount of additional filament. This is supposed to get you a really smooth top surface. In this case, what it did was melt the excess lumpy filament and push it around ... so I just got really smooth lumps. It also re-melted some of the base color filament at the margins and smeared the two colors together. Ew.

Trying to wish away the problem with bad ironing (left) and final product after the problem was actually fixed (right).

I finally realized that the print was warping. It was subtle enough that I didn't notice it until I looked for it; the fact that the top surface was always worse toward the edges finally got me to check. And sure enough, the bottoms of the coasters weren't flat. The center was staying in place while the outer rim curled away from the print bed. This explained both the nasty upper surface and the thunking extruder. The warping was raising the already-printed layers closer to the nozzle, forcing it to drag across them as it printed the last layer and effectively jamming it.

Warping can be caused by uneven cooling of the lower layers, and one of the standard solutions is to raise the print bed temperature (assuming you have a heated bed). The articles I've seen about printing with PETG seem to vary widely on what they think a good bed temperature is. Some give 70 C as the high end of the ideal range; others give it as the low end! The articles that counseled a fairly low bed temp steered me wrong at first, but once I identified the warping I started raising it, and ended up settling on 80 C (which still might not have been high enough, but I was running out of time for experiments). I also added a pretty big brim to the print ... and for good measure, once the brim was done printing, I strapped it to the bed with extra blue tape so it couldn't curl up.

Last before (left) and after (right) photo.

The other thing that helped was turning off the layer cooling fan. Not turning the speed down, no, I turned it completely off. I did this before I figured out the warping was happening, so it didn't solve that, but it did seem to stop the weird "whiskers" from forming on the top layer. And it didn't seem to have any disadvantages. Supposedly layer cooling is not as important for PETG as it is for some of the other materials.

I finally manufactured a set of coasters that I was happy to give as a gift -- after making so many bad ones that I have a complete set of "mistakes" to keep for myself. I think they were worth the effort, because the final results look amazing. The only thing I might change for the future is to try turning on z-hop to get rid of the "construction lines" on the final layer, but I don't find these obnoxious. (Z-hop can cause its own problems with stringing, and by the time I solved the warping I was ready to stop messing with settings and finish the project.)

Translucent PETG shines.

In summary, if you want to print in PETG and are interested in learning from my mistakes:

*For perfect bed leveling, you may just have to do a bunch of test prints. Getting it right by using a piece of paper/cardstock to check the distance between nozzle and bed is pretty hard.
*For a good first layer, PETG likes a greater nozzle height. If that means you can't get it to stick, try just doing the first layer very slowly.
*Clean your nozzle often.
*Try turning off the layer cooling fan.
*Check for warping, especially if you are doing a wide, flat print. Make sure your printer is enclosed, and raise your bed temperature if you have trouble.
*Don't be afraid to try very high (up to 100 C) bed temperatures.
*If your extruder is jamming, and you know you have the nozzle temperature high enough, and the nozzle is not clogged, CHECK FOR WARPING.
*If you have a garbage top layer because something is wrong with your print, ironing will not fix it!

The printer adding the first white layers to a red/white coaster.

Until the next cycle,

Jenny

Monday, June 8, 2020

Hissing Silence Shell 3D Print

Since January, I've been working on my first foray into some 3D print design. I wanted to recreate the “Hissing Silence Shell” ghost drone design from Destiny 2. Though I had the 3D files from the game's mobile app to work with via http://www.destinystlgenerator.com/, a massive amount of conversion was still required to make them into working printable objects. This gave me a great opportunity to learn how to use my CAD program of choice, DesignSpark Mechanical.
3D printed Hissing Silence Ghost Shell

I've posted the completed design on Thingiverse: https://www.thingiverse.com/thing:4436583

A screenshot of the original HSGS from Destiny 2

I studied the landscape of free CAD programs before settling on DesignSpark Mechanical as the first one to try. My feelings about it are mixed. It's an incredibly frustrating program, but I have no idea whether the alternatives are any better. I like its overall concept of directly manipulating the geometry by pushing and pulling faces, cutting objects with other objects, creating “blends” between lines, and so forth. In practice, it often reacts to commands with “this too complicated, I can't even” and spits out an error message that tells you nothing about how to fix the problem.

Exploded 3D model in DesignSpark
Final 3D model of all the clamshell pieces, in DesignSpark
Some of my models ended up with tiny gaps between faces that DesignSpark absolutely refused to fill in; I had to fix them in MeshMixer after exporting them as STLs. Others had to be repaired in MeshMixer because they were inside-out. Either of these problems seems to prevent surfaces from turning into solids, which makes some types of manipulation more difficult. Some operations make DesignSpark bog down or even crash (rounding curved edges was especially bad in this regard). It doesn't have a real mirror tool. And though YouTube has video tutorials for the basics, there were still a lot of important things I had to figure out by blundering around.
One of the original Destiny 3D files

The initial models from the game were mostly hollow surfaces with holes in them. To get to a proper printable design, I had to …

*Slice the original objects up into reasonable pieces
*Reconstruct missing surfaces and close up all the gaps
*Replace low-poly (blocky) geometry with smooth curves
*Manually re-create surface details, since all of these turned out to be part of the texture rather than the model
*Add all of the pegs and holes so the parts would fit together

The core

By the time I started on the core, I had gotten a fair bit of DesignSpark practice under my belt, and I wanted to print a smoother sphere (the original was an approximate sphere made of triangles). So I used the model from the game as a sizing reference only, and created the core parts from scratch. Part of the back half is converted into a knob that lets you turn the LED light on and off without disassembling the ghost.

Clamshell interior

Disassembled core

The final product has 34 distinct pieces that interlock, press, or snap-fit together. It took a long time to print, but it's a beauty.


Next I need to take this new CAD knowledge and do some work on Atronach. The ghost is more or less an eyeball, so it might serve as a helpful starting point.
Until the next cycle,
Jenny

Sunday, January 19, 2020

QIDI Tech X-one 2 3D Printer Review + Bragging

I decided to make the leap and buy myself a 3D printer a while back, and got it up and running last August.  Now that it's seen heavy action making Christmas presents for all my friends, it's time for me to say what I think of it.  The cost was about $350 (and the price of this model has dropped since then).

The QIDI Tech X-one 2 is a pretty traditional fused deposition modeling (FDM) printer that prints in XYZ coordinates.  The print head moves in the XY directions, and the print bed moves in the Z direction.  The bed is heated, and the print head includes a cooling fan.  The build volume is a cube 140 mm on a side.

Kirby without shoes. Model by SnickerdoodleFP, https://www.thingiverse.com/thing:3051355  This is a relatively low-detail model, so it was one of the first things I made. However, I had some trouble getting all of his tiny toe pads to stay stuck to the print bed. Slowing the print speed down helped with this. Then, partway through the print, the supports for his right arm came loose from the bed, leaving the printer to keep dropping filament on thin air. I caught this shortly after it happened and babysat the printer for a while, flicking away the junk filament so it wouldn't ruin the rest of the model, until the printer managed to connect some of the strings to Kirby's foot and rebuild the bottom of the support on thin air. In the end his arm came out just fine. I never saw that kind of thing happen again, thank goodness.
First, let me say that compared to that robot arm which provided my previous 3D printing experience, the X-one 2 is a dream to operate.  Aside from the fact that this particular arm just plain had ... problems ... having a print bed that is solidly attached to the printer, instead a taped-down piece of glass, is really nice.  You don't have to re-level the bed every time you print, or worry about bumping something midway through and ruining it all.  My co-worker got the arm because he wanted a giant print volume, but if that's not a concern of yours ... don't print with a robot arm.  Not worth it.

Flexi-dragon. Model by Benchy4Life, https://www.thingiverse.com/thing:3505423 This was another very easy print. The articulated parts come out of the printer already interlocked and ready to move once you've loosened them up in your hands. Each wing and the body print flat; then you snap the wings into a hole in the back.
The X-one 2 comes out of the box mostly assembled -- I only had to attach some structural parts, like acrylic windows and handles.  The manufacturer was also very thorough about making the printer order self-contained; it comes with its own accessory kit that includes every tool you need for the assembly steps, a scraper, and a glue stick.  The only thing missing is some tape to cover the print bed (perhaps not strictly necessary, but I've never wanted to print without it and risk wear and tear on the surface).

Steampunk articulated octopus. Model by Ellindsey, https://www.thingiverse.com/thing:584405. Each pair of tentacle segments forms a ball-and-socket joint. They print out separately and snap together. I painted the body, but left the tentacles in their natural color so that the joints wouldn't scuff over time. It printed out like a charm, but trimming and assembling all the tentacle pieces was a bit of work.
For temperature control purposes, the printer is enclosed on all sides but the top.  It has a metal frame and is built like a tank.  I like this because, again, it enhances the printer's stability.  On-site control of the printer is accomplished through a touch screen.  I'm not as wild about this, because it seems like the kind of thing that might wear out before the rest of the printer does ... but it is handy.  You can get files into the printer via either direct USB connection to your computer, or SD card.  So far I have only used the SD card.  This lets me keep the printer parked on the tile floor in the kitchen, and out of the overcrowded computer room.

Grizzly bear statue, pre-paint. Model by BenitoSanduchi, https://www.thingiverse.com/thing:24309  This is a miniature replica of the Grand Griz bronze at U of M. (This was for a friend, mind you ... I'm a Bobcat.) BenitoSanduchi created the model by taking a 3D scan of the original.
It comes with its own slicing software which is just a customized older version of Cura.  I used this for a few prints before switching to regular Cura to get a wider range of settings.  This introduces a mild annoyance, because the X-one 2 is not one of the printers for which Cura has pre-sets.  You have to enter it as a custom printer and figure out the correct parameters yourself (or get them from someone on the internet who already has).  Otherwise, Cura is a capable slicer, and I have no serious complaints about it.

Destiny Ghost. Model by BoldPrintShop, https://www.thingiverse.com/thing:527736  Ghost was one of the easier things to print -- being very smooth and geometric -- and one of the more complicated things to post-process, since there were many individual pieces to sand and paint.  The striping is "Last City" style, without the other details.
I started out printing a test cube.  Unlike the sad cubes that I got out of the robot arm, it printed with  nice straight vertical sides.  The back was a little shorter than the front, indicating that I needed to adjust the bed leveling.  I tweaked that and proceeded to a more complicated print.  No problems whatsoever.

Iris boxes. Model by LoboCNC, https://www.thingiverse.com/thing:1817180 The neat thing about these is that they come out of the printer in one piece; you can't take them apart. The "leaves" of the iris form between the curved walls of the box, already mated to the tracks that they run on. Print-in-place objects like this are tricky, because your printer has to be precise enough to form all the parts without sticking them together. The Qidi had no trouble; every box I made worked.
Many prints later, the X-one 2 has never had a major failure, and the overall quality is fantastic.  I've made several miniatures at 0.1 mm layer height, and tiny details like eyes, teeth, spines, etc. come through in the final product.  With the right kind of supports (use roof!) even the under-surfaces end up looking pretty good.

Voronoi pattern skulls. Model by shiuan, https://www.thingiverse.com/thing:518748 This was one of the more challenging prints. The contact points that tie the entire back of the skull down to the print bed are fairly small, and they kept wanting to pop loose (which would ruin the model). After several failed attempts to get the scaled-up version past its first few layers without this happening, I added a brim to the model so it would stay stuck. The downside is that I had to cut this away afterward. The model comes with break-away support sticks that shore up the more crucial points; still, it has a lot of little arches hanging over empty air. The printer got the basic form down all right, but left a lot of messy loops, strings, and rough edges on the undersides. And since the interior of the skull is an enclosed space, I couldn't just sand them off. I ended up parking in front of the TV with it and going over the whole thing with a craft knife. WORTH IT.

Now, for all the issues I can think of:

* The documentation is sparse, and poorly translated into English.  The PDF on the included thumb drive is more complete than the printed manual, so make sure to refer to that.
* When you want to change filaments, you're supposed to be able to heat the current filament and run the feeder in reverse to back it out.  For my printer at least, this doesn't work.  The sorta-warm filament just below the feed gears develops a bulge, which jams it so that it will feed neither backward nor forward.  Twice now, I've had to disassemble the print head and cut the filament to get it out.  I'm hoping that just heating it, holding down the manual lever that disengages the feeder, and pulling it free will work better.
* It seems to be possible for the printer to retain a bad state or incorrect awareness of position when it is shut down.  Two or three times, at the beginning of the first print attempt after turning it on, it has started by trying to drive the print bed down through the floor of the printer.  I'm not sure exactly what causes this, but I haven't seen it since I started 1) making sure to always push the button on the "print complete" dialogue box before turning off the printer and 2) never removing the SD card while the printer was on.
* I've gotten the "sensor error or power is not enough!" error a couple of times.  It seems to mean that the connector to the heated print bed is loose.  I re-seat or wiggle it and the printer is good to go on the next try.
* The printer sings most of the time, but if I turn up the travel speed too much, it sounds ... bad.  A little grindy.  I don't know if this is evidence of a real issue or not.

Cylindrical box. Model by Alphonse_Marcel, https://www.thingiverse.com/thing:3193735. This was a long print, and the supports for all the little bits of relief were a pain to remove. Other than that, it had no problems. It has a really nice twist-and-lock closure.
Overall recommendation: this is a good first printer.  Not perfect, but still usable with a minimum of fuss, and capable of supplying high-quality PLA prints.

Red dragon by mz4250, https://www.thingiverse.com/thing:2830828. I wasn't sure if the printer was going to be able to do this. The model has umpteen delicate spines, individual fingers, arms and wings hanging out over empty space ... The first try didn't go so well, because I hadn't figured out the best way to generate supports yet -- the bottoms of his right arm and upper jaw came out a mess. For the second try, I turned on "roof support," which prints a kind of throwaway cradle for the bottom of any elevated part (like the arms). I also scaled him up to the maximum size that would fit in my printer. Success. A couple fingers are a little shorter than they should be -- the tips came off with the supports. Other than that, all the details came out beautifully.
Goals for the new year: learn a CAD program and get some robot parts turned out.

Until the next cycle,
Jenny